Myst V - End of Ages
Ragahrotirah - The Great Shaft
Accessing the upper ventilation control
- At the bottom of the shaft, take the stairs, either way, down
to the button for activating
the mechanism for elevating the shaft floor. Push the button.
The timer will begin counting down. The other buttons must be
reached within one minute as the timer counts down.
- Run the rest of the way down the stairs and across the floor to the other side. Enter either of the stairways and climb to the second button for activating the floor elevating mechanism. Push the button.
- Run back down the stairs and across to the center of the floor.
Push the button on the center of the floor to begin raising the
floor.
- When the floor stops rising, go through the cave like entrance to find the upper ventilation control. Turn on the upper ventilation system.
- Go to the left to find the linking book to the Nolobon podium on Direbo.
Accessing the lower ventilation control
- Return to the push button on the center of the floor. Push the button to return to the lower level.
- Reactivate the floor raising mechanism as before. Push the button at the center of the floor.
- Quickly run off of the rising floor before it starts to move.
- Descend one of the ladders to the area below the rising floor.
- Take the tunnel to the lower ventilation control. Move the lever to the left to turn on the lower ventilation system.
- Head back to the area beneath the rising floor. While in the access tunnel, encounter a ladder that has descended from the ceiling. Climb the ladder to an upper tunnel.
- Go left to open a door to the rising floor area. Go right to access the forth linking book to the Laki'ahn podium on Direbo.
Taghira
Escaping from the ice cave
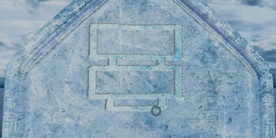
- To escape the ice cave, look for the diagram etched in the ice on the floor.
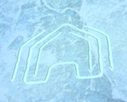
- Drop the slate tablet on the diagram and back away. A bahro will come to pick up the slate and, in the process, cause a crack to form in the ice.
- Once again retrieve the slate and go stand on ice crack formed in step 2. This time the crack will widen into a hole that you will drop into, revealing an exit.
Getting the slate up the ladder
- Drop the slate, letting a bahro return it to the podium in the ice cave.
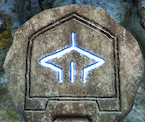
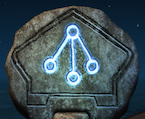
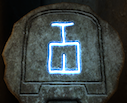
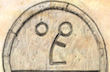
- Climb the ladder and go to the podium. Make a note of the symbol
on podium.
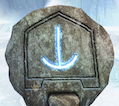
- Also make a note of the symbol carved in the ice wall behind the podium.
This symbol causes the bahro to summon heat and steam from below ground.

- Touch the lower symbol on the podium to return to the ice cave.
- Sketch on the slate the symbol from step 2. Drop the slate and back away. A bahro should appear and transport the slate to the podium above the ladder.
- When the symbol appears on the ice cave podium, touch it to link to the podium above the ladder.
- Take the slate to the podium in the area of the bulb plants.
Crossing the lake
- Go to each bulb plant and turn on all the steam valves.
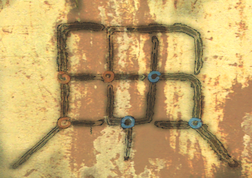
- Go to the valves that control the radiator pipes under the lake.
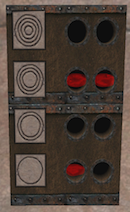
- Draw on the slate the symbol that orders the bahro to summon heat.
- Set the blue valves to the following positions right, left, left.
- Set the red valves to left, right, left. Now give yourself some time by waiting for the heat spell to end.
- Reactivate the heat spell by repeating step 3. Cross the lake on the crust bridges, formed on the lake surface by the heat coming up from the radiator pipes.
- Take the slate to the podium on the other side of the lake.
Getting to the keep
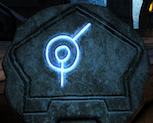
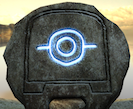
- Go to the keep and make a note of the symbol on the podium.
- Draw the symbol on the slate and drop it on the ground for a bahro to pick up. The bahro will transport the slate to the keep, resulting in a symbol added to the ice cave podium.
- Link back to the ice cave and, from there, link to the keep.
Todelmar
Turning on the power
- Follow passage behind the four telescope control panels to the power panel.
- Set the left lever to the half way point and the right lever to the three quarters point.
Clearing the way to the roof
- Go to the right rear telescope panel. The display for this damaged telescope system will show only static (snow).
- Slide the vertical positioning lever to the full up position. (The position of the horizontal lever does not matter.)
- Push the flashing green button.
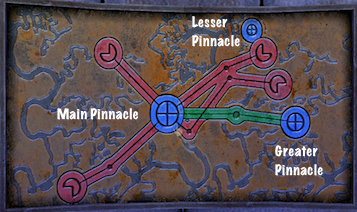
De-obstructing the line-of-sight to the lesser pinnacle podium
- Go to the roof access dome. Behind the door find a push button to deploy the steps leading below. Push the button.
- Go down the stairs to the tram car cable tensioning system.
- Move the cable tensioning (top) lever to the right position, and pull the tensioning handle once. This de-tensions the cable, moving the tram car pulley on the roof.
- Restore tension to the cable by moving the tensioning lever back to the left hand position, and pulling the tensioning handle once.
- Use the roof top telescope to see the podium on the lesser
pinnacle. Make a note of the symbol carved on the podium.
- Draw the symbol on the slate and drop the slate. The bahro will move the slate to the lesser pinnacle podium, thus establishing a link to the lesser pinnacle.
De-obstructing the line-of-sight to the greater pinnacle podium
- Before linking to the lesser pinnacle, use the roof top telescope
to find the white glyphs near the greater pinnacle tram car landing
deck. Make a note of these glyphs.

- Link to the lesser pinnacle. Use the lesser pinnacle telescope to
find the white glyphs near the main pinnacle tram car landing deck.
Make a note of these glyphs.

- Link back to the main pinnacle and go to the telescope control panels.
- Adjust the front right control panel as indicated by the greater pinnacle glyphs.
- Adjust the front left control panel as indicated by the main pinnacle glyphs.
- Link back the the lesser pinnacle and use the telescope to find the podium on the greater pinnacle.
- Make a note of the symbol on the podium.
- Draw the symbol on the slate and drop it. The bahro will move the slate to the greater pinnacle podium, thus establishing a link to the greater pinnacle.
Turning on power in the greater pinnacle
- Link to the greater pinnacle and go down the steps immediately to the left. Climb down into the tram car and exit the rear of the car. Take the stairs up to the power control panel.
- Adjust the left lever a tad less than three quarters up, and the right lever to the half way position.
- To get back to the roof ascend the stairs and press the button to deploy the stairs.
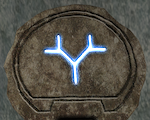
- Make a note of the glyph to the right of the roof access doorway.
This glyph causes the bahro to summon the time dilation effect.

Establishing a link to the observation satellite
- Take the tram from the greater pinnacle to the main pinnacle. At
the half way stopping point, make a note of the glyphs to the left
(when facing towards the main pinnacle).
- Continue forward to the the main pinnacle. Retrieve the slate tablet.
- Return to the telescope control area and go to the left rear control panel.
- Set the controls as indicated by the glyphs found at the tram car half way point.
- Draw the time dilation glyph and drop the slate. The bahro will summon the time dilation effect.
- Once the effect ends, place the telescope on high resolution to
see the linking symbol for the observation satellite. Make a note
of the symbol.
- Draw the symbol on the slate and drop it. The bahro will move the slate to the observation satellite, thus establishing a link to the satellite.
Noloben
Getting the combination to unlock the dome - part I
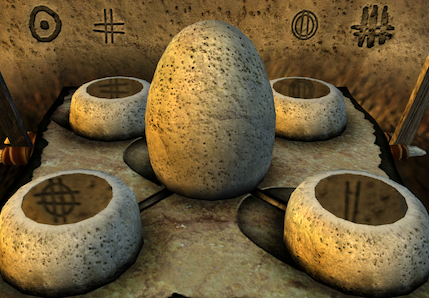
- After linking to Noloben go to the left around the bend to find the four bowl shrine.
- On the slate draw the summon rain sign (on the stone lying in front
of the shrine.
- Drop the slate and back away. The bahro will come and summon rain.
- When it ceases raining, make a note of the glyph reflected in each
of the four bowls. These four glyphs are the key to obtaining the
combination that opens the dome.
Getting the combination to unlock the dome - part II
- Near the podium find the rope ladder leading up to the island's
high ground and the dome. (Note you cannot climb the ladder while
holding the slate.)
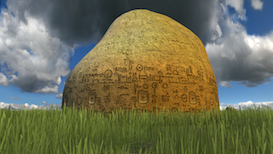
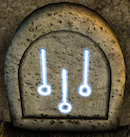
- Go to the dome. Note that there are three windows open. Look through each of the windows. Slide slightly left and right to catch a view of an open window on the other side of the dome. Observe the symbol above the window.
- Go around the dome to the open window and close it. Observe of the glyph on the outside of the window shutter.
- Now begins a rather tedious process. Open pairs of windows all the way around the dome. Make a table consisting of the glyphs seen above each window. Alongside each glyph - the glyph seen in the interior above each window - also note the glyph appearing on the outside of that window's shutter.
- Using the table created in step 4, for each of the four glyphs reflected in the bowls of the four bowl shine, look up that glyph's associated window shutter glyph.
Unlocking the dome
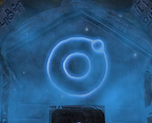
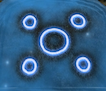
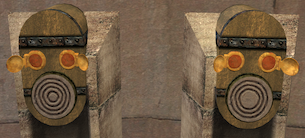
- Now orient to the dome by going back to the ladder. Look towards the dome. Each of the four small pillars around the dome corresponds to one of the bowls of the four bowl shrine. From the position of the ladder, the front pillar to the right corresponds to the front right hand bowl of the shrine: the front left hand pillar to the front left hand bowl, the rear right hand pillar to the rear right bowl, etc.
- Set each of the pillars to the window shutter glyph associated with the
glyph reflected in the bowl corresponding to that pillar.
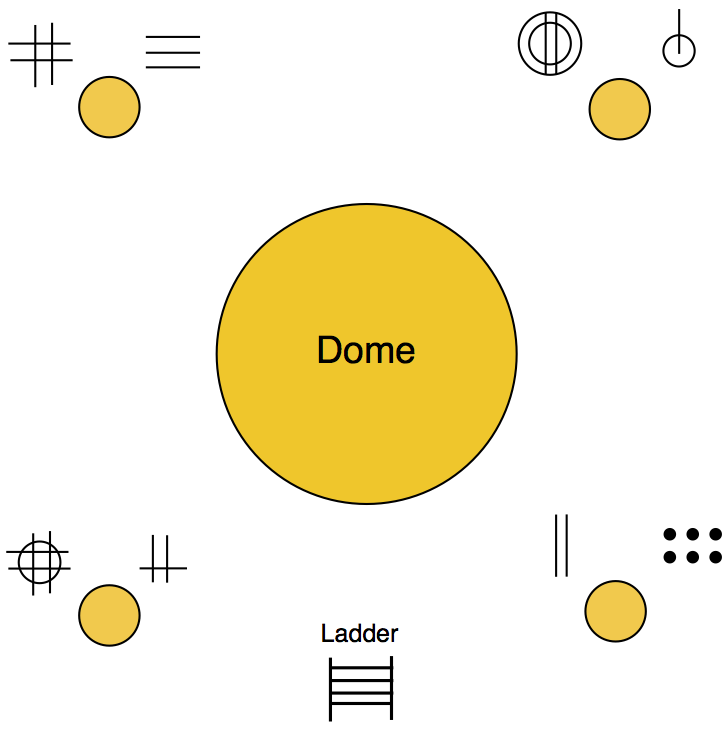
In the diagram above, the left hand symbol above each pillar is the glyph reflected in the corresponding bowl at the four bowl shrine. The right hand symbol is the glyph from the corresponding window shutter. Set the pillars to the glyph shown to the right of each pillar in the diagram above.
- Climb down the ladder and retrieve the slate. Find the small passageway
just to the right of the ladder. The passageway will now be open
all the way to the dome. Take the slate to the podium inside the dome.
Gaining access to the dome roof
- Return to the ladder and climb back up to the dome.
- Go to one of the small pillars and rotate the head to some other symbol than the one currently set. This seals the dome.
- Return to the inside of the dome by linking via the main podium on the beach. The ladder to the roof of the dome should now be accessible.
- Climb to the roof of the dome. Make a note of the symbol on the podium.
- Return to the podium inside the dome. Pick up the slate previously left on the podium.
- Link to the main podium on the beach.
- On the slate draw the symbol found on the dome roof podium. Drop the slate so the bahro can create a link to the dome roof podium.
- From the main podium link to the dome roof podium. The slate should now be resting on this podium.
Gaining access to the keep
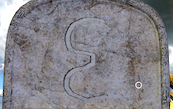
- On the slate draw the symbol of the snake (found in Yesha's journal).
Drawing the snake on the slate will prevent the bahro from picking
up the slate until the slate auto-erases after a two minute timeout.
- Drop the slate on the pattern carved in the floor underneath the telescope.
- From the dome roof podium link to the main podium.
- Travel to the passageway a small distance beyond the four-bowl shrine. Go through the passageway. From the exit travel to the door that was visible from the dome roof telescope.
- Wait in front of the door until it disolves. Quickly enter the keep chamber.
- Make a note of the symbol on the podium.
- Link back to the main podium. Pick up the slate and draw the symbol from step 6. Drop the slate and back away. The bahro will establish a link from the main podium to the keep.
- Use the link established above to link back to the keep.
Laki'ahn
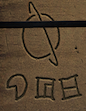
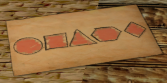
The jeweler's room combination
- Go to the trade house and look through the far left window. The jeweler's
door combination appears on a scrap of paper lying on the table. The
combination consists of several geometric figures drawn in a specific
order. Make a note of the combination.
Accessing the arena from the holding area
- Head around to the rear of the compound. On the way, in the area with the
bones, find the symbol for summoning wind. Make a note of the symbol.

- Continue heading around to the rear of the compound. Find the control panel for the windmill mechanism.
- On the slate draw the wind summoning symbol. Drop the slate and back away. The bahro will summon the wind.
- Retrieve the slate and go to the wind mechanism control panel.
- Pull the left lever to activate the mechanism. Pull the middle lever once to raise the holding area cage one notch. Pull the right lever three times to rotate the cage, allowing access to the cage podium. Push the left button to open the holding area gate, allowing access to the arena.
- Place the slate on the cage podium to establish a link to the podium.

- Retrieve the slate from the podium and return to the windmill control panel.
- Draw the wind summoning symbol on the slate and drop it. When the wind starts recover the slate and continue on to the control panel.
- Pull the left lever to activate the mechanism. Pull the right lever three times to rotate the cage, allowing access from the cage podium to the arena area.
- With slate in hand, return to the main podium and link to the cage podium. From the cage podium travel to the arena.
Accessing arena podium
- Weigh yourself on the scale to the left of the controls for elevating the
podium elevating. Note your weight while holding the slate. You should
weigh two three-concentric-circles plus one one-circle.
- Go to the far left control and push the button twice to change the
setting from one four-concentric-circles to no (zero) four-concentric-circles.
Push the center (larger) button to activate the mechanism. This should
lower the podium, allowing access to the podium.
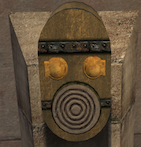
- Place the slate on the podium and leave it there.
- Set the far left control to two four-concentric-circles. Set the second from
the left control to two three-concentric-circles. Push the center button.
- Return to the cage podium, link to the main podium, and from there link to the arena podium.
- Retrieve the slate and exit the podium. Without your weight on it the podium will rise.
Accessing the trade house
- From the arena podium, head to the right and take the first left into an alcove. The jeweler's door will lie straight ahead. Use the combination noted previously to open the door.
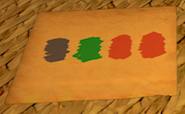
- Enter the trade house and head to the side room on the right. Find a scrap
of paper with blue, green, and red blots scribbled on it. Make a note
of the sequence of these colors.
Getting through the basement maze
- From the arena podium, turn to the right, and travel all the way around to the balustrade that leads out to the arena gate control. Pull the lever to open the gate.
- Head down to arena floor, through the gate just opened, and into the basement area.
- Travel to the tunnel branching off from the side of the main tunnel. At the end of the branch tunnel find the floor switch plate.
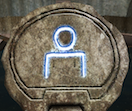
- On the slate, draw the sing song symbol. Drop the slate onto the floor
switch plate. The sing song symbol will cause the bahro to stand on
the plate long enough for you to get to the second basement level.
- Raise the counter weight, located just before the floor switch plate.
- Head to the circular elevator floor directly ahead. The bahro should appear, standing on the floor switch plate, just long enough for the elevator to ascend to the second floor. Quickly exit the elevator.
- Using the scrap of paper with the color blots as a clue, travel the maze path marked by the buttons: red, red, green, blue. Push each button as you pass it.
- Upon leaving the maze, observe the podium just outside the exit. Make
a note of the symbol on the podium.
- Link back to the main podium and find that the bahro have placed the slate there. On the slate draw the symbol noted above. Drop the slate, allowing the bahro to establish a link to the maze exit podium.
Getting to the keep
- Head to raised wooden fort with the balanced hanging door. Set the weights as follows (from left to right): one, two, three, and six.
- Travel around to the right, through the tunnel and up to the fort. Towards the rear of the fort, overlooking the water, find a flag hanging down.
- To see the symbol on the flag, draw the wind symbol on the slate and
drop it. Once the bahro have summoned the wind, retrieve the slate
and look at the flag. Make a note of the symbol on the flag.
- On the slate draw the symbol from the flag, drop the slate. The bahro will transport the slate to the keep.
- Go back to the maze exit podium, link to the main podium, and from there link to the keep.
Finale
You are linked back to K'Veer. At this point save the game. There are four possible ways you can end the game. Enjoy!