Myst III - Exile
Janein
Narayan Gateway Tusk
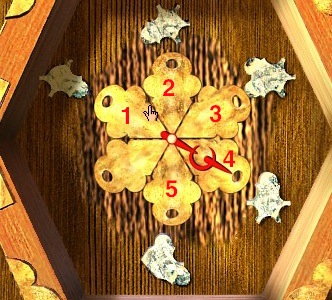
 Amateria, Voltaic, and Edania are all accessed by correctly setting ball
bearings in the four-concentric-ring puzzle. The settings are determined
by using the observation devices found in the main tusk. Implement the
solution below by setting the ball bearing in the outer most ring and working
inward to the inner most ring. The diagram to the right illustrates the
sixteen possible positions a ball bearing may have in a ring. The
access codes are:
Amateria, Voltaic, and Edania are all accessed by correctly setting ball
bearings in the four-concentric-ring puzzle. The settings are determined
by using the observation devices found in the main tusk. Implement the
solution below by setting the ball bearing in the outer most ring and working
inward to the inner most ring. The diagram to the right illustrates the
sixteen possible positions a ball bearing may have in a ring. The
access codes are:
- Voltaic: 9, 12, 8, 4
- Edania: 15, 11, 8, 10
- Amateria: 15, 5, 8, 11
These codes also must be set on the observation devices in the main tusk. Upon returning from each age, place the diagram received in each age on the diagram reader. This will cause the Narayan linking book to become one step closer.
With 16 possible positions in each ring, and with 4 rings, the number of possible combinations equals 164 or 65,536.
Voltaic Gateway Puzzle
- Line up all the light mirrors until rainbow colored light floods the tusk door.
- Push the color coded buttons in the order of the reflectors from input to output: yellow, blue, green, red, yellow, purple, red.
- Enter the tusk and set the ball bearings to: 9, 12, 8, 4.
Edania Gateway Puzzle
- Near the base of the Narayan tusk, push a powder puff plant to encourage the squee to begin feeding.
- Push the top of the squee's den to encourage him out.
- Go back to the ear (sound collecting) flower and point it at the sounds of the feeding squee. The tit plants should swell up making a bridge to the tusk door.
- Enter the tusk and set the ball bearings to: 15, 11, 8, 10.
Amateria Gateway Puzzle
- Near the tusk, find the control panel. It is located down a ladder just past and to the right of the tusk.
- Using the control panel, move the barrel to the far right of the access ramp. This will take several control lever movements.
- Find the ladder down to the ramp. Take the ladder down and open the tusk door.
- Go back to the control panel. Move the barrel back down the ramp towards the door. It should fall into the tusk providing access to the combination lock.
- Enter the tusk and set the ball bearings to: 15, 5, 8, 11.
Voltaic
Lava Puzzle
Notice that the large, geared transmission not only raises the control platform up and down, it also controls the flow of lava into and out of the room. In the following steps CW means clockwise and CCW means counter-clockwise.
- Access this puzzle by going to the gondola bay. Just past the steam controls, climb the ladder up to the large, overhead pipe that crosses the canyon.
- Cross the pipe and enter the man hole to the right. Crawl through the tunnel to the lava control room.
- In the control room, go to the control panel and rotate the control lever CCW. This drains the lava and allows access to the lower room.
- Descend to lower room. Go through the door to the second control panel.
- Rotate the lever CW to raise the platform.
- Shift the lever to the left. (You can now view Sevedro's painting.)
- Rotate the lever CCW to continue raising the platform.
- Go forward on the platform to the fan switch and turn the fan on.
- Go back to the control panel and rotate the lever CW to lower the platform.
- Shift the lever to the right.
- Rotate the lever CCW to continue lowering the platform.
- Shift the lever to the left.
- Go back to the control room and rotate the lever CCW to open the sluice allowing lava to reenter the lower room.
Generator Puzzle
- Access the waterwheel sluice control by going through the overhead
manhole near the distributor status panel.
- Operate the sluice control so as to shut off the flow of water through
the transmission room.
- Continue on and go down the man hole to transmission room. Engage the
transmission by cranking the shaft up.
- On the way back to the water sluice control, look to the left for a
broken porthole window. Push the waterwheel paddle into the full open
position.
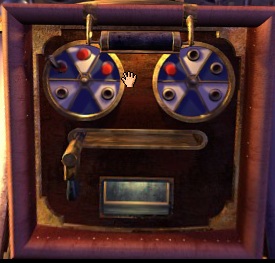
Distributor Puzzle
- Go to switch panel number one (D'ni number one).
- In the following steps, push the RIGHT buttons only.
- Push the top and bottom buttons until the top and bottom circuits are
complete. (The vertical runs will be aligned.)
- Push the middle button until the middle circuit completes the top and
bottom circuits.
Steam Puzzle
The gondola must be inflated with exactly 19 units of steam pressure.
Initially the indicator reads zero units and moves counter-clockwise as
pressure increases. Each 3rd level valve increases pressure by 1 unit;
each 2nd level valve by 4 units; each 1st level valve by 10 units.
Closing one valve on the 3rd level provides 1 unit,
two valves on the 2nd level provides 8 units, and one valve on the first
level provides 10 units. Together all the closed valves provide
a total of 19 units. Note that the elevator runs on steam pressure, so
the valves need to be closed for the elevator to ascend.
- Close all valves on the 1st level. Take elevator to the 2nd level.
- Close all valves on the 2nd level. Take elevator to the 3rd level.
- On the 3rd level close one valve. (Three should be left open.)
- Take elevator back to the 2nd level. Open two valves.
(Two should be left closed.)
- Take elevator back to the 1st level. Open three valves. (The valve on
the far right is permanently stuck closed.)
Edania
Squee Puzzle
- Swing on the vine trapeze over to the squee trap.
- Raise trap using the winch to the right of the trap.
- Knock a pink berry onto the ground and move it beyond the range of
the trap. (The object is to scare the squee, not capture it.)
- Return to the trapeze and activate the trap. (The squee should run away,
clearing a path in the process.)
Orchids Puzzle
- Preliminary to this puzzle, each of the water bulbs should be activated.
Activating the water bulbs moves the electric fish down to the pond below the
flower in which the bird is trapped.
- Go to the first orchid and align so as to reflect sunlight to the
second orchid. The first orchid may be found at the end of the path
that leads straight ahead and downward from Sevedro's painting.
- Go to the second orchid and align it to reflect light to
the retractable fern. (The fern will unfurl.)
- Cross the retractable fern and proceed to the forth orchid.
- Align the forth orchid so as to reflect light to the nearby sunflower.
(Look through the orchid sighting hole and point it toward the sunflower.)
- Go back to the first orchid and align it so as to reflect sunlight
to the third orchid. (This will free the trapped bird.)
Bird Flower Puzzle
- Go to the lowest level in Edania.
- Find the retractable palm plant and push it so that it extends to
shield sunlight from the first onion flower.
- Go to the first onion flower and push the powder puff plant to send a
puff into the air. (The puff scares away the butterflies from around the
flower's pestle, so that they migrate to the second onion flower.)
- Go to the fifth orchid and align it so as to reflect sunlight to the
second onion flower's pestle. (This will open the flower.)
- Go back to first onion flower and enter the hole in the side of the
second onion flower's stem.
- Proceed all the way up the flower's pestle to the top and pull the
lever.
- Wait for the freed bird to come pick you up.
Amateria
Lever Arm Puzzle
 This puzzle opens up the yellow section of the orbiter track.
To solve this puzzle it is necessary to calculate the counter weight
necessary to balance a fixed weight consisting of seven wooden weights
and one crystal weight. From clues found in Janein, one crystal weight
is equivalent to four wooden weights, and one narastone weight is
equivalent to four crystal weights. Thus the fixed weight is
equivalent to 11 wooden weights. Since the lever arm ratio is 2:1, the
counter weight must be equivalent to 2 times 11, or 22 wooden weights.
There is only one correct solution out of 21 possible combinations of
wood, crystal, and narastone weights.
This puzzle opens up the yellow section of the orbiter track.
To solve this puzzle it is necessary to calculate the counter weight
necessary to balance a fixed weight consisting of seven wooden weights
and one crystal weight. From clues found in Janein, one crystal weight
is equivalent to four wooden weights, and one narastone weight is
equivalent to four crystal weights. Thus the fixed weight is
equivalent to 11 wooden weights. Since the lever arm ratio is 2:1, the
counter weight must be equivalent to 2 times 11, or 22 wooden weights.
There is only one correct solution out of 21 possible combinations of
wood, crystal, and narastone weights.
- Go to lever arm control panel and continue on to the weight room.
- Place on the lever arm counter balance two wooden weights and one
narastone weight (together equivalent to 18 wooden weights). Note that the
counter balance platform, attached to the lever arm, counts for four wooden
weights.
- Go back to the control panel, and move the fulcum to the far left.
- Launch an orbiter.
- When the control box closes, note the pattern on its lid.
Force Field Puzzle
 This puzzle opens up the blue section of the orbiter track.
Each force field must turn off momentarily in order to let the orbiter pass.
A timing sequencer on the control panel determines the timing and sequence
which momentarily turns the force fields off and on. A sub-control panel
located near each force field ties that force field to a specific timing
sequencer position. That is, the sub-panels determine the order in which
the force fields turn off and back on. There is only one correct solution
out of 3125 possibilities.
This puzzle opens up the blue section of the orbiter track.
Each force field must turn off momentarily in order to let the orbiter pass.
A timing sequencer on the control panel determines the timing and sequence
which momentarily turns the force fields off and on. A sub-control panel
located near each force field ties that force field to a specific timing
sequencer position. That is, the sub-panels determine the order in which
the force fields turn off and back on. There is only one correct solution
out of 3125 possibilities.
- Go to force field track. Find where the orbiter first enters the track.
(This is the track leading from the top of the orbiter switching house.)
- Follow the track to the first force field. (Move around the track as the
orbiter would move around the track.) The control panel is located
just to the left of the force field ring.
- On the control panel set the spinner to position 1 (10:30 position).
This is marked by the symbol where the marble first enters the sequencer in
the main control panel.
- Follow the track to the second force field. On the control panel, set
the spinner to position 2 (12:00 position).
- Similarly, set the spinners for the remaining three force fields.
- Go to the main control panel (located just off a portion of the yellow
orbiter track near Sevedro's painting).
- Launch an orbiter.
- When the control box closes, note the pattern on its lid.
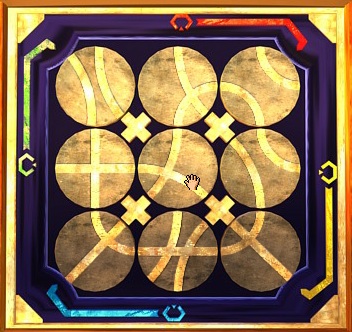
Turn Tables Puzzle
 This puzzle opens up the green section of the orbiter track.
Two turntables are each controlled by a respective sequencer mounted in the
control panel. The sequencers determine the stops each table makes during
its rotation. Initially the left table moves counter-clockwise to its first
stop. Then the right table moves clockwise to its first stop. This pattern
continues until both tables have made a complete rotation. Pegs placed in
the sequencer holes determine where the stops are made.
This puzzle opens up the green section of the orbiter track.
Two turntables are each controlled by a respective sequencer mounted in the
control panel. The sequencers determine the stops each table makes during
its rotation. Initially the left table moves counter-clockwise to its first
stop. Then the right table moves clockwise to its first stop. This pattern
continues until both tables have made a complete rotation. Pegs placed in
the sequencer holes determine where the stops are made.
As the orbiter moves
from turn table to turn table, the stops must happen in such a way that the
orbiter lands in a valid position on the turn table. (A ring with a cup is
a valid position; an open ring is not.) Hence, the provided three pegs
must be placed in the correct holes so as to provide a path for the
orbiter to transit from turn table to turn table until the orbiter reaches
the exit track. There is only one correct solution
out of 84 possibilities.
- Set the left turn table sequencer. Counting counter-clockwise from the
bottom, place pegs in the second and third holes.
- Set the right turn table sequencer. Counting clockwise from the bottom,
place a peg in the second hole.
- Launch an orbiter.
- When the control box closes, note the pattern on its lid.
Switching House Puzzle
The track switches, located in the switching house, must be correctly set
so as to provide a continuous path for the orbiter from start to finish.
There are four sections of track that must be switched together. The first
three consist of the sections of track corresponding to each of the three
puzzles solved above. The last section goes from the switching house to the
track terminus. The switches are set by a control panel located near the
ceiling of the switching house.
- Access the switching house by setting the access ramp locks to each one
of the patterns found in the three puzzles above. (The order of the patterns
does not matter.)
- Enter the switching house and proceed up the stairs to the swivel chair.
- Sit in the swivel chair and pull the chair release handle.
- Open up the switch control panel.
- Start with the blue path at bottom of the panel and turn the disks so
as to create a continuous path all the way to the red path. (There is only
one solution.)
- Overhead, press the blue button to launch an orbiter. (You will ride
along inside the orbiter.)
Narayan
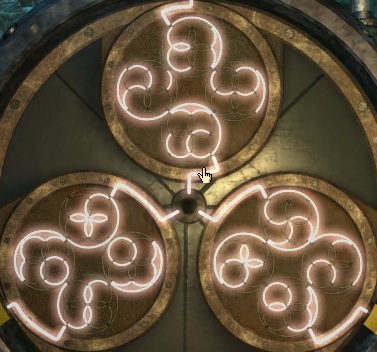
First Word Puzzle
Enable the left control panel by moving the shield control lever to
the left. Then take the stairs up to the upper level and locate the power
lever. Turn on the power. To enable shield control, three, four word
phrases must be entered in the control panel. The control panel consists
of three circular areas. A phrase must be entered in each of these areas.
The first word of the phrase goes at the top, and the remaining words
clockwise around the area. The order of the phrases does not matter, as
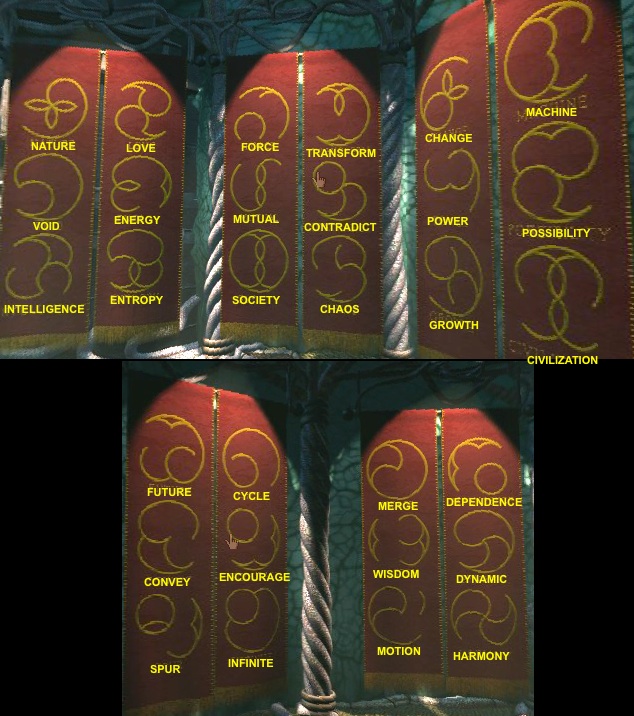
long as the words are in the correct order. The Narayan written translation
of the words must be used. Translations of Narayan words are found on the
red and gold wall hangings.
The three phrases (from Atrus' journal) are:
- Energy Powers Future Motion
- Nature Encourages Mutual Dependence
- Dynamic Forces Spur Change
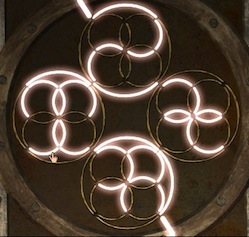
Second Word Puzzle
Move the shield control lever to the right to access the lower level wall
hangings and to activate the right control panel. This time the control panel
consists of only one circular area. Similar to the first word puzzle, a
phrase must be entered into this area. The first word of the phrase goes
at the top, and the remaining words clockwise around the area.
The phrase that must be entered (again from Atrus' journal):
- Balanced Systems Stimulate Civilization
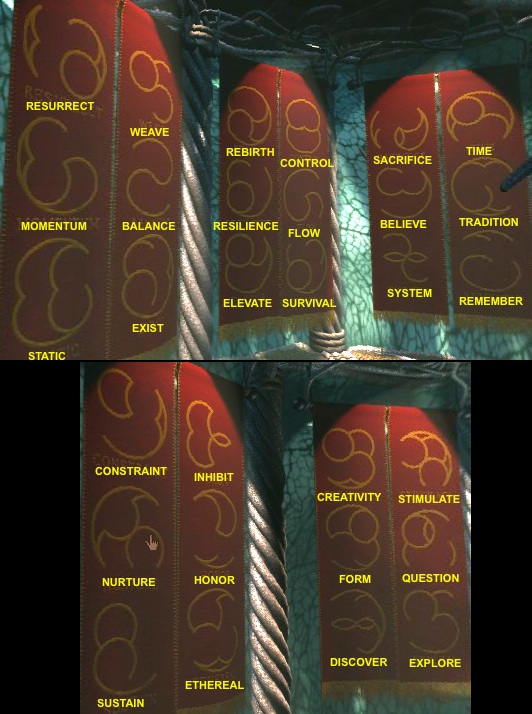
Since there are 60 Narayan words given, and a phrase consists of 4 unique words, where order is important, there are 11,703,240 possible four word phrases.
Addendum - Narayan Wall Hangings
- Access the waterwheel sluice control by going through the overhead manhole near the distributor status panel.
- Operate the sluice control so as to shut off the flow of water through the transmission room.
- Continue on and go down the man hole to transmission room. Engage the transmission by cranking the shaft up.
- On the way back to the water sluice control, look to the left for a broken porthole window. Push the waterwheel paddle into the full open position.
Distributor Puzzle
- Go to switch panel number one (D'ni number one).
- In the following steps, push the RIGHT buttons only.
- Push the top and bottom buttons until the top and bottom circuits are
complete. (The vertical runs will be aligned.)
- Push the middle button until the middle circuit completes the top and
bottom circuits.
Steam Puzzle
The gondola must be inflated with exactly 19 units of steam pressure. Initially the indicator reads zero units and moves counter-clockwise as pressure increases. Each 3rd level valve increases pressure by 1 unit; each 2nd level valve by 4 units; each 1st level valve by 10 units.
Closing one valve on the 3rd level provides 1 unit, two valves on the 2nd level provides 8 units, and one valve on the first level provides 10 units. Together all the closed valves provide a total of 19 units. Note that the elevator runs on steam pressure, so the valves need to be closed for the elevator to ascend.
- Close all valves on the 1st level. Take elevator to the 2nd level.
- Close all valves on the 2nd level. Take elevator to the 3rd level.
- On the 3rd level close one valve. (Three should be left open.)
- Take elevator back to the 2nd level. Open two valves. (Two should be left closed.)
- Take elevator back to the 1st level. Open three valves. (The valve on the far right is permanently stuck closed.)
Squee Puzzle
- Swing on the vine trapeze over to the squee trap.
- Raise trap using the winch to the right of the trap.
- Knock a pink berry onto the ground and move it beyond the range of the trap. (The object is to scare the squee, not capture it.)
- Return to the trapeze and activate the trap. (The squee should run away, clearing a path in the process.)
Orchids Puzzle
- Preliminary to this puzzle, each of the water bulbs should be activated. Activating the water bulbs moves the electric fish down to the pond below the flower in which the bird is trapped.
- Go to the first orchid and align so as to reflect sunlight to the second orchid. The first orchid may be found at the end of the path that leads straight ahead and downward from Sevedro's painting.
- Go to the second orchid and align it to reflect light to the retractable fern. (The fern will unfurl.)
- Cross the retractable fern and proceed to the forth orchid.
- Align the forth orchid so as to reflect light to the nearby sunflower. (Look through the orchid sighting hole and point it toward the sunflower.)
- Go back to the first orchid and align it so as to reflect sunlight to the third orchid. (This will free the trapped bird.)
Bird Flower Puzzle
- Go to the lowest level in Edania.
- Find the retractable palm plant and push it so that it extends to shield sunlight from the first onion flower.
- Go to the first onion flower and push the powder puff plant to send a puff into the air. (The puff scares away the butterflies from around the flower's pestle, so that they migrate to the second onion flower.)
- Go to the fifth orchid and align it so as to reflect sunlight to the second onion flower's pestle. (This will open the flower.)
- Go back to first onion flower and enter the hole in the side of the second onion flower's stem.
- Proceed all the way up the flower's pestle to the top and pull the lever.
- Wait for the freed bird to come pick you up.
Lever Arm Puzzle
This puzzle opens up the yellow section of the orbiter track.
To solve this puzzle it is necessary to calculate the counter weight
necessary to balance a fixed weight consisting of seven wooden weights
and one crystal weight. From clues found in Janein, one crystal weight
is equivalent to four wooden weights, and one narastone weight is
equivalent to four crystal weights. Thus the fixed weight is
equivalent to 11 wooden weights. Since the lever arm ratio is 2:1, the
counter weight must be equivalent to 2 times 11, or 22 wooden weights.
There is only one correct solution out of 21 possible combinations of
wood, crystal, and narastone weights.
- Go to lever arm control panel and continue on to the weight room.
- Place on the lever arm counter balance two wooden weights and one narastone weight (together equivalent to 18 wooden weights). Note that the counter balance platform, attached to the lever arm, counts for four wooden weights.
- Go back to the control panel, and move the fulcum to the far left.
- Launch an orbiter.
- When the control box closes, note the pattern on its lid.
Force Field Puzzle
This puzzle opens up the blue section of the orbiter track.
Each force field must turn off momentarily in order to let the orbiter pass.
A timing sequencer on the control panel determines the timing and sequence
which momentarily turns the force fields off and on. A sub-control panel
located near each force field ties that force field to a specific timing
sequencer position. That is, the sub-panels determine the order in which
the force fields turn off and back on. There is only one correct solution
out of 3125 possibilities.
- Go to force field track. Find where the orbiter first enters the track. (This is the track leading from the top of the orbiter switching house.)
- Follow the track to the first force field. (Move around the track as the orbiter would move around the track.) The control panel is located just to the left of the force field ring.
- On the control panel set the spinner to position 1 (10:30 position). This is marked by the symbol where the marble first enters the sequencer in the main control panel.
- Follow the track to the second force field. On the control panel, set the spinner to position 2 (12:00 position).
- Similarly, set the spinners for the remaining three force fields.
- Go to the main control panel (located just off a portion of the yellow orbiter track near Sevedro's painting).
- Launch an orbiter.
- When the control box closes, note the pattern on its lid.
Turn Tables Puzzle
This puzzle opens up the green section of the orbiter track.
Two turntables are each controlled by a respective sequencer mounted in the
control panel. The sequencers determine the stops each table makes during
its rotation. Initially the left table moves counter-clockwise to its first
stop. Then the right table moves clockwise to its first stop. This pattern
continues until both tables have made a complete rotation. Pegs placed in
the sequencer holes determine where the stops are made.
As the orbiter moves from turn table to turn table, the stops must happen in such a way that the orbiter lands in a valid position on the turn table. (A ring with a cup is a valid position; an open ring is not.) Hence, the provided three pegs must be placed in the correct holes so as to provide a path for the orbiter to transit from turn table to turn table until the orbiter reaches the exit track. There is only one correct solution out of 84 possibilities.
- Set the left turn table sequencer. Counting counter-clockwise from the bottom, place pegs in the second and third holes.
- Set the right turn table sequencer. Counting clockwise from the bottom, place a peg in the second hole.
- Launch an orbiter.
- When the control box closes, note the pattern on its lid.
Switching House Puzzle
The track switches, located in the switching house, must be correctly set so as to provide a continuous path for the orbiter from start to finish. There are four sections of track that must be switched together. The first three consist of the sections of track corresponding to each of the three puzzles solved above. The last section goes from the switching house to the track terminus. The switches are set by a control panel located near the ceiling of the switching house.
- Access the switching house by setting the access ramp locks to each one of the patterns found in the three puzzles above. (The order of the patterns does not matter.)
- Enter the switching house and proceed up the stairs to the swivel chair.
- Sit in the swivel chair and pull the chair release handle.
- Open up the switch control panel.
- Start with the blue path at bottom of the panel and turn the disks so as to create a continuous path all the way to the red path. (There is only one solution.)
- Overhead, press the blue button to launch an orbiter. (You will ride along inside the orbiter.)
First Word Puzzle
Enable the left control panel by moving the shield control lever to the left. Then take the stairs up to the upper level and locate the power lever. Turn on the power. To enable shield control, three, four word phrases must be entered in the control panel. The control panel consists of three circular areas. A phrase must be entered in each of these areas.
The first word of the phrase goes at the top, and the remaining words clockwise around the area. The order of the phrases does not matter, as long as the words are in the correct order. The Narayan written translation of the words must be used. Translations of Narayan words are found on the red and gold wall hangings.
The three phrases (from Atrus' journal) are:
- Energy Powers Future Motion
- Nature Encourages Mutual Dependence
- Dynamic Forces Spur Change
Second Word Puzzle
Move the shield control lever to the right to access the lower level wall hangings and to activate the right control panel. This time the control panel consists of only one circular area. Similar to the first word puzzle, a phrase must be entered into this area. The first word of the phrase goes at the top, and the remaining words clockwise around the area.
The phrase that must be entered (again from Atrus' journal):
- Balanced Systems Stimulate Civilization
Since there are 60 Narayan words given, and a phrase consists of 4 unique words, where order is important, there are 11,703,240 possible four word phrases.
Addendum - Narayan Wall Hangings